Subscribe For Free Updates!

We'll not spam mate! We promise.

Showing posts with label PC Tips. Show all posts

10 Things You Need to Know About Windows 8.1

surface-pro
Windows 8 was very different from Windows 7, but change is only speeding up — Windows 8.1 has seen quite a few changes since Windows 8. You’ll have new things to learn, whichever which version of Windows you’re upgrading from.
This isn’t an exhaustive list, but it will help you get to grips with Windows 8.1 and locate the settings you may be looking for — especially if they’ve moved since Windows 7 or 8.

Desktop Options Aren’t Enabled By Default

Microsoft made a significant effort to make Windows 8.1 less awkward for desktop users, but the only difference you’ll notice by default is that the Start button is back. If you want to boot to the desktop and prevent the app switcher and charms from appearing when you move your mouse to the top corners of your screen, you’ll need to configure these options yourself. To do so, right-click your taskbar, select Properties, and change the options on the Navigation tab.
windows-8.1-desktop-navigation-options

You Can Shut Down in Two Clicks

Press Windows Key + X or right-click the Start button to open the power user menu. This menu contains shortcuts with quick access to commonly used options like the Control Panel, Task Manager, and File Explorer. On Windows 8.1, you can now shut down from this menu — it takes just as many clicks as it did on Windows 7.
windows-8.1-shut-down-from-power-user-menu

Default File Associations Are Still Frustrating

Windows 8.1’s file associations are still obnoxious for desktop users. When you open an image from the desktop, you’ll be whisked away to the full-screen Modern interface with your taskbar and entire desktop hidden. It would make sense for each environment to have its own file associations, so you’d see a desktop program when you opened a picture from the desktop, but Microsoft hasn’t done this.
If you use the desktop, you’ll need to head into the Default programs control panel and change the default file associations for images, PDFs, music, and video files.
windows-8.1-set-default-programs-to-desktop

Bing Integration Can Be Disabled

Microsoft’s Bing search engine is integrated in Windows 8.1, allowing you to easily search with Bing from the system’s search feature. To accomplish this, searches you start typing on your computer will be sent to Bing’s servers. If you’d rather not have the searches you type sent to Bing, you can disable Bing integration from the Search and apps panel in the PC Settings app.
windows-8.1-disable-bing-integration

Tiles Aren’t Created By Default

Windows 8 automatically created tiles on your Start screen when you installed a Windows 8 app or desktop program. Windows 8.1 no longer does this, allowing you full control of your Start screen layout. To add tiles for newly installed programs, click the arrow button or swipe up on the Start screen. Right-click or long-press an application shortcut and select Pin to Start to create a tile for it.
windows-8.1-pin-to-start-create-tile

SkyDrive Only Syncs Files in the SkyDrive Folder, Mostly

Windows 8.1’s SkyDrive integration will only synchronize files and folders in your SkyDrive folder at C:\Users\NAME\SkyDrive. You can’t synchronize folders outside of this folder, and the old symbolic link trick won’t work either. SkyDrive will also sync the photos in your Camera Roll folder, but it won’t sync other images in your Pictures folder.
To sync another folder, you’ll have to try moving it into SkyDrive and creating a symbolic link elsewhere.
sync-external-files-with-skydrive-on-windows-8.1

Libraries Are Hidden By Default

Libraries are now hidden by default, even though they’re still used heavily by Modern apps. For example, image applications have access to your Pictures library, while video players have access to your Videos library.
To make libraries visible again, right-click in the left pane of the File Browser and select Show libraries.
show-libraries-on-windows-8.1

Internet Explorer’s Two Interfaces

Internet Explorer still offers two interfaces — the full-screen, Windows 8-style one and a desktop application. When you launch the Internet Explorer tile from the Start screen, you’ll see the Windows 8-style Internet Explorer.
If you’d rather use the desktop version of Internet Explorer when you click the Internet Explorer tile, open IE on the desktop, click the gear menu, and select Internet options. Click the Programs tab and set Internet Explorer to open “Always in Internet Explorer on the desktop.”
If Internet Explorer isn’t your default browser, it will always open on the desktop and you’ll be unable to change this setting.
make-internet-explorer-tile-open-on-the-desktop

Snap is Improved

Snap is an extremely important part of using Windows 8 apps, as it allows you to use multiple apps at a time. It feels fairly limited on a laptop or desktop, but it’s refreshing and powerful on a tablet.
To snap an app, swipe in from the left of your screen and position the app’s tile at the left or right sides of the screen. It will snap alongside the current app. With a mouse, move your mouse to the top-left corner of the screen and drag-and-drop the app’s tile onto your screen where you want it. You can now resize the apps to use as much space as you like or even view three or more apps on screen at once, depending on your screen resolution. Windows 8.1’s Modern interface is much more powerful than Windows 8’s.

Administrative Tools Are Hidden By Default

The system tools found in the Windows Administrative Tools folder — applications like the Task Scheduler, Event Viewer, Services, and Computer Management tools — are normally hidden. They won’t appear in your All apps list and you won’t be able to find them by searching your installed applications, either. If you need them, head to the Start screen, press Windows Key + C, select Settings, select Tiles, and enable the Show administrative tools option on the Tiles pane. They’ll show up in All apps and appear when you search for them by name.
windows-8.1-show-administrative-tools

We mostly focused on the desktop here, but tablet users aren’t left out. If you use Windows 8.1 on a tablet, check out our list of new features Windows 8.1 brings for tablet users.

Things you shold know about Windows 7


Windows XP may be gone, but all is not lost. Windows 7 may replace it as the legacy Windows OS of choice, especially considering the little-known features hidden away in Windows 7 that may make you realize just how much you love the OS.
Hidden features you say? Absolutely. They include keyboard shortcuts, secret tricks and other interesting features that most long-term Windows 7 users never realized existed, and a few features that amazingly were added as late as the last year or two – evidence by the fact that they were just recently added to the Windows 7 New Features download provided by Microsoft.
I highly recommend that download, but if you don’t have time to sift through it, the following are a few highlights of the more impressive, little-known features that could boost your productivity and deepen your love for Windows 7.


Playing With Open Windows

Most people who’ve used Windows 7 long enough accidentally stumble upon some of the more useful features that it offers, such as the convenient enhanced taskbar where you can hover over program icons and see a small graphic thumbnail of the actual application window without opening it.
This greatly enhances the speed with which you can find the right application to open, but that enhanced taskbar also includes a few interesting keyboard shortcuts not a lot of people know about:
  • Pressing Shift before clicking on the icon opens up a new instance, even if existing windows are open.
  • Holding Shift+Ctrl does the same, except it opens the new instance with administrator permissions!
  • Holding Ctrl before clicking an icon will open the window instance that you most recently used in a group of open windows.
You might have already known you could maximize an open window by sliding it over to the top of the screen, or resizing it to fill half the desktop by sliding the window over to the side. Did you know that you could do the same thing without even touching your mouse? Yup – with the active Window open, the following shortcuts to the same thing.

How to Protect Your Computer From Viruses

How to Protect Your Computer From Viruses

computer security virus tipsWith millions of computer users browsing the web at any given time, there are plenty of targets for malicious coders. While computer experts don’t always know why coders choose to build harmful computer programs, the fact is that it happens all the time. Computer viruses can steal personal information, interfere with normal operations, attract spam and even shut down your computer’s hard drive. Protecting your computer is critical for browsing success.

Start With the Basics

Most computer systems come with security features already in place. For example, the Windows operating system is packaged with Microsoft Windows Security Center. When you first open, boot up and register a new computer, you should make sure that this program is functioning. It will give basic protection against spyware, viruses and malware. In addition, a basic firewall is built into this program, providing additional protection and stops for potentially harmful programs. Upon activation, don’t be surprised if your security system needs immediate updating. Software that protects your computer needs regular and consistent updating to stay useful. Viruses are constantly being generated and the several-month lag between when your computer was made and when you first started using it can mean that the database the security system is loaded with is severely out-of-date.

Upgrade to Meet Your Needs

Many people operate computers for a long time with only basic protection in place. However, heavy computer users or those who have risky browsing habits can sometimes benefit from upgrading their virus, spyware and malware protection, as well as using a fuller-featured firewall; this is especially important if you use a networked computer system. Basic or free virus protection will still scan and update for viruses. Paid programs, however, offer more features, including ease-of-use and convenience features. The most important thing is to verify the publisher and make sure you are getting what is promised. Most well-known virus protection programs, such as AVG and Norton Security, have reviews available to help you make your choice.

Learn About Spyware Risks

Spyware creates risks that many computer users are not aware of. If you are only protecting against viruses, you could be leaving your computer open to damage. Most people are familiar with spyware that initiates and attracts annoying ad programs. Spyware, however, can be much more malicious as well. Your shopping habits can be tracked by spyware. While not exactly harmful, some people consider this a breach of privacy. The worst spyware programs interfere with normal operations and can even track what you type, sending personal information to people who want to steal your identity. Some spyware redirects your browser to different web addresses, increasing your risks of virus infection and fraud.

How Viruses Work

The main difference between spyware and viruses is how they are spread. A virus reproduces itself and attaches to any document that the computer sends, while spyware can be stored as a cookie or tracking code. A virus is most often found traveling with a piece of computer software, such as a document, picture or piece of music. When dealing with email, it is necessary to open an attachment to become infected, indicating that, in most cases, the computer user must somehow invite the malicious software to replicate on their system. Of course, most people have no idea it is there or what is happening. Some of the sneakiest and most harmful viruses actually masquerade as virus protection software, making them extremely hard to detect. Because of this, it’s crucial to be familiar with your particular virus protection program and know what it looks like and what the normal scripts and prompts are during operation. Viruses do some of the same things that spyware does; they just accomplish it differently. An active virus can steal personal information, generate ads or shut down your system, including the very virus protection programs that can fix the issue.

Take Steps For Protection

Like anything, the best way to protect against viruses is to be educated. Become familiar with what malicious software may look like. If you get an email or are asked to download a file that you don’t recognize or looks suspicious, do your homework. Research virus protection, spyware, malware and firewall programs and use them to their fullest capacity. Set the software to update and scan automatically to make sure that the system is constantly monitored. In addition, regularly check on the databases published by various virus protection services; many will provide lists of symptoms and risks, as well as the standard way the file gains access for no cost to the public.

How to Add Touch Screens to LCDs

How to Add Touch Screens to LCDs

Converting a monitor to a touch screen is simple with an overlay.
Touch-screen interfaces offer increased functionality with programs that use multiple icons, icons or writing text. If you have an LCD monitor you otherwise find acceptable for your computer but need the functionality of a touch screen, you can purchase an overlay to make the conversion. The task is straightforward, working with most all programs and PCs.

Step 1

Clean the bezel of the monitor with an alcohol wipe. Clean the screen itself with screen cleaner solution and microfiber cloth.

Step 2

Remove the hook-and-loop fastener or double-sided tape backing on one side. Press the adhesive gently yet firmly along the areas prescribed by the overlay's manufacturer.

Step 3

Connect the supplied wire harness to the control box or board. Slip the included USB cable into the other end of the board.

Step 4

Lay the monitor on its back, face up. Remove the other side of the adhesive tape or hook-and-loop fastener. Press the touchscreen overlay touch side out to the bezel. Allow a few minutes for the adhesive to set up.

Step 5

Remove the bezel from the front of the LCD monitor, if necessary. Use the appropriate screwdriver to loosen the screws from the back of the monitor, then pop off the bezel. Lay the touchscreen over the regular screen, then reattach the bezel.

Step 6

Install the setup and driver disc that came with the overlay, if applicable. Follow the onscreen prompts to install the drivers as directed. Restart the computer if prompted.

Step 7

Touch the included stylus in the specified locations on the overlay to calibrate the device.

Warnings

  • If the overlay fits under the monitor's bezel, use caution not to overtighten the screws that affix it to the monitor.

Required Items

  • Screwdriver
  • Microfiber cloth
  • Screen cleaner solution

Computer code in films

Computer code in films: hidden meanings or irrelevant nonsense?

From the the scrolling text in The Terminator to the hacking methods in The Girl with the Dragon Tattoo, one programmer is on a mission to crack movie codes
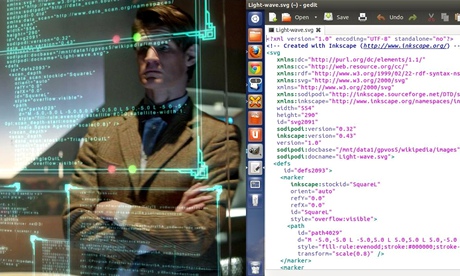
The Doctor examinines an SVG file taken from Wikipedia
The Doctor examines an SVG file taken from Wikipedia.
Ever wondered what those Matrix-style green holographic codes that flicker across computer screen in films actually mean? You know, those seemingly complex algorithms in The Fifth Estate and unbreakable cryptograms in Doctor Who? Well, programmer John Graham-Cumming has the answer.
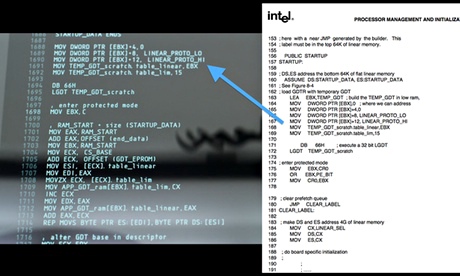
"I was watching the film Elysium and some coding came up as the space station is rebooted, and I thought: 'This is really familiar', so I tracked it down," explains Graham-Cumming, who started coding at the age of 13 on his BBC Microcomputer and is now a well-known blogger and programmer. "It turns out that the code is actually taken directly from the Intel software developer's manual, which I found amusing. So I tweeted that and got hundreds of responses." Last Friday, he launched a Tumblr to compile more examples; by Monday morning it already had 11,000 followers and Graham-Cumming was inundated with suggestions for movie codes to crack.
Code from Elysium Code from Elysium. Photograph: John Graham-Cumming/Tumblr The process of identifying the sources of movie codes is actually quite simple. Graham-Cumming takes a screengrab and immediately gets a sense of whether the code is possibly legitimate or utter nonsense. If an unusual character or variable stands out, he picks it out and Googles it. In most cases, whether the codes is purporting to guide a missile or rifle through confidential databases, it's likely to be a pretty mundane cut and paste job.
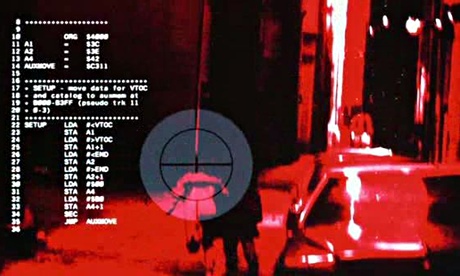
There are some real howlers. Graham-Cumming was tickled while watching Antitrust, a thriller about a wannabe Bill Gates: "I cracked up watching these computer nerds looking at code, nodding and saying: 'Whoa, this is great man,' when it was really the most basic Java script that is completely meaningless." In The Terminator, we see the world through T-800's head-up display, yet the scrolling text accompanying the crosshair in his vision is the harmless assembly code for an Apple-II. But the sources for fake coding just get better: in one episode of Doctor Who, Matt Smith looks intently at some hovering code, yet on closer inspection, it's the reference for a simple image file – a picture of a lightwave – lifted from Wikipedia.
Code in The Terminator Code in The Terminator Photograph: John Graham-Cumming/Tumblr Computer programmers must laugh when they see characters in films adjusting their thick-rimmed glasses, furiously typing, then gazing at a code that probably only says: "Hello world." Graham-Cumming finds it surprising, though, that these details, which might be central to a plotline, are rarely given more thought and attention by directors, particularly as plausible codes are so easy to find through open–source websites such as GitHub and SourceForge.
However, there are some impressive examples of programming detail. Jurassic Park was clearly ahead of its time: actors worked on realistic, high-performing Silicon Graphics computer systems and in one classic classic scene, teenager Lex Murphy logs on to the computer and exclaims: "It's a Unix system, I know this," which relates to a real operating system.
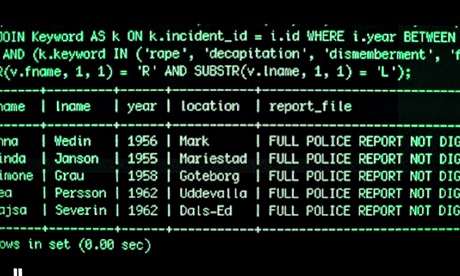
Code in The Girl with the Dragon Tattoo  
Code in The Girl with the Dragon Tattoo. Photograph: John Graham-Cumming/Tumblr More recently, The Social Network provided a visually compelling, technically authentic narrative about the process of programming. When Mark Zuckerberg, played by Jesse Eisenberg, types the commands for "facemash" using PerlScript, it is woven in with his explanation of the procedure in plain text and HTML on his blog. In David Fincher's The Girl with the Dragon Tattoo, heroine Lisbeth Salander is depicted as searching for files using the same process that real developers use. With the rise of high-definition screens and screen-capture tools, and with gadgets such as Google Glass increasingly likely to be used on screen, there will only be more opportunities for smart-ass code-reading. Directors take note.

Burn a CD on Windows XP without using software

Burn a CD on Windows XP without using software

Windows XP comes with a builtin CD-copy feature that not many people are aware of. Although almost everyone has his/her favorite CD-copy software to stick with, it is still good to know about this CDR feature from Windows XP. You will find it very useful when you come to another PC that doesn't have a CD-copy software, and you can't just install your favorite software to it. With this feature, you can write some data or MP3 files to a CD/DVD, or erase a re-writable CD/DVD.
If you're using a Re-Writable CD (CD-RW), make sure the disc is blank. You might need to erase (or "format") it before use. For information how to erase a CD-RW on Windows XP without using any other software, see this article.

Requirements: You need to enable the CD-R feature on Windows XP. If you haven't done so, see this article.


  1. Insert a Formated-ReWritable CD or a Recordable (CD-R) disc into the CD drive.
  2. From Desktop, double-click on "My Computer".
  3. Navigate to the files/folders you want to copy to CD. Select them and press "Ctrl-c" to copy.
  4. Browse back to the CD-ROM, and press "Ctrl-V" to paste. The files/folders will show up as temporary files/folders at this time.


  5. On the left panel, select "Write these files to CD".


  6. The window "CD Writing Wizard" appears with the default CD name. Change the CD name if you wish, then click "Next".


  7. The "CD Writing Wizard" starts to write files/folders to the CD:


  8. Once the writing process is complete, the wizard will disappear and the CD-Rom will be ejected.

How to Reset Windows Password

Reset Windows Password

Forgot your administrator password? Don't panic, it happens to some other people too, and you have found the solution! The following instructions will show you step-by-step how to reset your local Windows password. This only works for local user accounts, however, not domain accounts.The password recovery tool from this page is written by Petter Nordahl-Hagen, and the original information, as well as the downloadable tool, can be found from his website. According to the author, this tool should work for Windows NT/2000/XP/Vista.
WARNING! Users who have EFS encrypted files on the Windows XP or Vista computers will loose access to the EFS encrypted files after recovery of your password!

Use this trick at your own risks
The tool to reset your password can be downloaded here.

I. Download the bootdisk:
  1. Download the bootdisk, which includes the password recovery tool here. The file contains the ISO CD image.
  2. Unzip (extract) the ISO file and burn it to a CD. Note that this is an ISO file, you must burn it to CD as an ISO image, not as a "data" file. If you're not sure how, see this article. Also, the image is bootable, you need to burn the image to a CD using the image burning feature; do not extract the contents of the ISO and burn them to the CD, you'll end up with a CD that can't boot!

II. Understanding the process:
  • You'll use the bootdisk created from the above steps to bootup your computer, which you want to reset your administrator password.
  • You'll be asked for things like: which drive is the boot drive, which path to the SAM file, etc.. but don't worry, details will be provided.
  • Once you have selected an account to reset the password, you'll need to type in a new password; however, it is highly recommended to use a BLANK password at this point, then you can change your password later in Windows.
  • Follow the prompts to the end. You'll need to save the changes at the end!

III. OK! Enough talking. Here are the steps:
  1. Startup your computer with the bootdisk created above. You should see a welcome screen following with a prompt:
    	boot:
    
  2. Just wait, the bootup process will continute automatically. Then you should see a screen similar to this:
    	=========================================================
    	. Step ONE: Select disk where the Windows installation is
    	=========================================================
    	....
    	NT partitions found:
    	 1 :   /dev/sda1    4001MB  Boot
    	 2 :   /dev/sda5    2148MB
    	
    	Please select partition by number or
    	a = show all partitions, d = automatically load new disk drivers
    	m = manually load new disk drivers
    	l = relist NTFS/FAT partitions, q = quit
    	Select: [1]
    
  3. Notice the last line "Select: [1]" which shows the [1] as default selection because the tool detected the bootup partition is [1]. This might be different on your own machine, so you should review the list shown under "NT partitions found:". The partition with the word "Boot" should be selected.

  4. Hit Enter once you confirm the selection. You should see a similar screen as follows:
    	=========================================================
    	. Step TWO: Select PATH and registry files
    	=========================================================
    	....
    	What is the path to the registry directory? (relative to windows disk)
    	[windows/system32/config] :
    
  5. Notice the last line "[windows/system32/config]" which shows the default path. This was also detected by the tool. If the path is correct, hit Enter, or if you wish to enter a different path, enter it now then hit Enter.
    Here are the paths for different versions of Windows:
    - Windows NT 3.51: winnt35/system32/config
    - Windows NT 4 and Windows 2000: winnt/system32/config
    - Windows XP/2003 (and often Windows 2000 upgraded from Windows 98 or earlier): windows/system32/config

  6. Once you hit "Enter", you should see the next screen similar to the following:
    	-r--------    1 0        0          262144 Jan 12 18:01 SAM
    	-r--------    1 0        0          262144 Jan 12 18:01 SECURITY
    	-r--------    1 0        0          262144 Jan 12 18:01 default
    	-r--------    1 0        0         8912896 Jan 12 18:01 software
    	-r--------    1 0        0         2359296 Jan 12 18:01 system
    	dr-x------    1 0        0            4096 Sep  8 11:37 systemprofile
    	-r--------    1 0        0          262144 Sep  8 11:53 userdiff
    
    	Select which part of registry to load, use predefined choices
    	or list the files with space as delimiter
    	1 - Password reset [sam system security]
    	2 - RecoveryConsole parameters [software]
    	q - quit - return to previous
    	[1]
    
  7. Hit "Enter" with the default option selected "[1]". Then ...:
    	=========================================================
    	. Step THREE: Password or registry edit
    	=========================================================
    	Loaded hives:   
    
    	  1 - Edit user data and passwords
    	  2 - Syskey status & change
    	  3 - RecoveryConsole settings
    		  - - -
    	  9 - Registry editor, now with full write support!
    	  q - Quit (you will be asked if there is something to save)
    
    	What to do? [1] -> 1
    

  8. Hit "Enter" with the default option selected "[1]". Then ...:
    	===== chntpw Edit User Info & Passwords ====
    
    	RID: 01f4, Username: <Administrator>
    	RID: 01f5, Username: <Guest>, *disabled or locked*
    	RID: 03e8, Username: <HelpAssistant>, *disabled or locked*
    	RID: 03eb, Username: <pnh>, *disabled or locked*
    	RID: 03ea, Username: <SUPPORT_388945a0>, *disabled or locked*
    
    	Select: ! - quit, . - list users, 0x<RID> - User with RID (hex)
    	or simply enter the username to change: [Administrator]
    

  9. Hit "Enter" with the default option selected "[Administrator]", or select another user account. Here you can enter the full user account surrounded by < and >, CASE-SENSITIVE, or enter the RID number (i.e. 0x1f4). Assuming you select the Administrator account, you should see the following screen:
    	RID     : 0500 [01f4]
    	Username: Administrator
    	fullname: 
    	comment : Built-in account for administering the computer/domain
    	homedir : 
    
    	Account bits: 0x0210 =
    	[ ] Disabled        | [ ] Homedir req.    | [ ] Passwd not req. | 
    	[ ] Temp. duplicate | [X] Normal account  | [ ] NMS account     | 
    	[ ] Domain trust ac | [ ] Wks trust act.  | [ ] Srv trust act   | 
    	[X] Pwd don't expir | [ ] Auto lockout    | [ ] (unknown 0x08)  | 
    	[ ] (unknown 0x10)  | [ ] (unknown 0x20)  | [ ] (unknown 0x40)  | 
    
    	Failed login count: 0, while max tries is: 0
    	Total  login count: 3
    
    	* = blank the password (This may work better than setting a new password!)
    	Enter nothing to leave it unchanged
    	Please enter new password: *
    

  10. At the prompt "Please enter new password", Enter the * for a blank password (HIGHLY RECOMMENDED!) then press Enter
    	Please enter new password: *
    	Blanking password!
    
    	Do you really wish to change it? (y/n) [n] y
    

  11. At the prompt, type in "y", then press Enter. Note that the default option is "n".
    	Do you really wish to change it? (y/n) [n] y
    	Changed!
    
    	Select: ! - quit, . - list users, 0x - User with RID (hex)
    	or simply enter the username to change: [Administrator] !
    

  12. Enter the "!" to go back to the main menu. Then select "q" at the following menu to quit:
    	<>========<> chntpw Main Interactive Menu <>========<>
    
    	Loaded hives:   
    
    	  1 - Edit user data and passwords
    	  2 - Syskey status & change
    	  3 - RecoveryConsole settings
    		  - - -
    	  9 - Registry editor, now with full write support!
    	  q - Quit (you will be asked if there is something to save)
    
    	What to do? [1] -> q
    

  13. A prompt to save changes displays, enter "y" to save:
    	=========================================================
    	. Step FOUR: Writing back changes
    	=========================================================
    	About to write file(s) back! Do it? [n] : y
    

  14. The changes are saved! You should see the following screen, press Enter, and reboot your computer.
    	Writing  sam
    
    	***** EDIT COMPLETE *****
    
    	You can try again if it somehow failed, or you selected wrong
    	New run? [n] : n
    

Convert Any Document or Web Page to PDF

Convert Any Document or Web Page to PDF

Somebody just told you that you need to have Adobe Acrobat (Writer) to create a PDF file? Guess what, you can get away from that pricey piece of software if you just need to convert some documents to pdf, without a need of fancy editing the pdf document.
Here's how. Thanks to the BullZip, who provides a Free Pdf printer. With this free tool, you can simply "print out" your document or webpage to a pdf file, just about the same way as you print it out to a printer.

You can visit BullZip.com for more information about the software.
Here the direct link to BullZip downloads page: Downloads
  1. To get started, first follow the link above and download Free Pdf Printer from BullZip, then install it to your computer.
  2. Once you're done, you might need to close the program (or the web browser) which you're currently viewing the document. This helps refreshing the list of available printers on your computer.
  3. Once you get back to the document you want to convert, perform the same steps are you print out the document, i.e. File > Print ...
  4. When you see the Print window pop-up, select "Bullzip PDF Printer" under "Printers", then click "OK".
  5. BullZip PDF Printer will then start to analyze your document and display a new pop-up window, where you can direct it to the location you want to save the pdf file.
  6. Follow the pop-up windows and.. hola! The PDF document is created!

3 Useful Windows Tricks You Should Know About

3 Useful Windows Tricks You Should Know About

While there are tons of software that can extend Windows’ functionality, there are also several hidden features/unknown tricks in Windows that many are unaware of. The good thing is that these hidden features can be triggered without using any third-party software. Here are three tricks which can do wonders for your productivity, saving lots of time and frustration.
Whenever someone wants to move or copy a file or a folder in Windows, the usual method is to use the “Copy” and “Paste” command, either with the shortcut keys or the options in the context menu. If you are always copying/moving files to one particular folder, you might want to place that folder in the right-click context “Send to” menu so you can copy/move files easily and quickly.
To add a particular folder to the “Send to” menu, run (Win+R) or type the following address:
C:\Users\[YourUsernameHere]\AppData\Roaming\Microsoft\Windows\SendTo
Now you just have to delete the items you do not want on your “Send to” menu and add shortcuts to the ones you want. In the screenshot below you can see what my “Send To” folder looks like (be advised that Windows automatically adds a “Send To” option for your CD/DVD drive):

The relationship between the Shift key and the right-click

The “Shift” key is actually an important tool to use with the right-click context menu. If you right-click a folder and, with the left mouse button, click an item in the “Send to” menu, that folder will be copied to that destination. If you use it together with the “Shift” key, the folder will be moved instead (this also works for files, of course).

The “Shift” key is also useful to the right-click context. As you can see in the screenshots above, if you press the “Shift” key while right-clicking a folder or a file, you get an expanded “Send to” menu with lots of possible destinations like Documents, Pictures, and also the folders you have in your Home folder (hidden on the right screenshot). Also, if you right-click a folder while keeping the “Shift” key pressed, you will get an “Open command window here” item in the right-click context, which can be quite useful.
Wrapping up this section:
  • In order to change the items from the “Send to” menu, navigate to “C:\Users\[YourUsernameHere]\AppData\Roaming\Microsoft\Windows\SendTo;
  • Press the “Shift” key while left-clicking a “Send to” menu item in order to move the file/folder rather than just copying;
  • Press the “Shift” key while right-clicking a file/folder in order to bring up an extended “Send to” menu;
  • Press the “Shift” key while right-clicking a folder to add an “Open command window here” item in the right-click context.
Printing is insanely useful, but in Windows, it can also be a nightmare. We have all had the nerve-racking experience of having to cancel a printing job and, when we want to print another document, the job we stopped is still on the printing spool, blocking all the new jobs. The usual solution is to reboot our computers, but there is an easier way to solve this problem.
The first step is to stop the “Print Spooler” service. Simply open the Start menu and type “services,” or open a Run dialog (Win+R) and type “services.msc.” Scroll down until you reach the “Print Spooler” service, right-click it and hit “Stop” – do not close this window. Now go to the following directory:
C:\Windows\System32\spool\PRINTERS
and delete all its contents (you need administrator privileges to reach it).
Head to the Services window, right-click the Printer Spooler service and start it again. That is it; your printing queue should be completely clear now.
User Account Control (UAC) is a security technology that works by limiting application software to standard users. While it can be naggy some times, I strongly advise you not to disable it. There is a way to surpass UAC for known apps with a small app.

ElevatedShortcut is a tiny piece of software developed by Sergey Tkachenko, and it doesn’t require any installation. ElevatedShortcut uses the Task Scheduler to create “elevated shortcuts” that do not trigger UAC. You can create a completely new elevated shortcut from an existing shortcut, or you can convert an existing one directly to an elevated state.
In the screenshot above, I turned a UAC triggering shortcut (you can see the little shield on top of the icon, meaning that opening it triggers UAC) into an “elevated” one which does not trigger UAC. ElevatedShortcut is really easy to use, making it a great tool in order to surpass the UAC dialog for known apps.
Were you aware about these Windows tricks? Do you think they are useful? Let us know in the comments.

BASIC WINDOWS SHORTCUT KEYS

Basic Windows Shortcut Keys

The followings are some basic PC shortcut keys that are supported in most IBM compatible computers. They are also supported in most application software.
 
Use at your own risk.
Shortcut Keys Supported Window Versions Description
Alt + e 95, 98, ME, NT, 2000, XP, Vista Pull down the top Edit menu.
Alt + f 95, 98, ME, NT, 2000, XP, Vista Pull down the top File menu
Ctrl + a 95, 98, ME, NT, 2000, XP, Vista Select all text.
Ctrl + c 95, 98, ME, NT, 2000, XP, Vista Copy selected item(s) (to clipboard).
Ctrl + f 95, 98, ME, NT, 2000, XP, Vista Find.
Ctrl + v 95, 98, ME, NT, 2000, XP, Vista Paste copied item(s) from clipboard
Ctrl + x 95, 98, ME, NT, 2000, XP, Vista Cut.
Ctrl + Ins 95, 98, ME, NT, 2000, XP, Vista Same as Ctrl + c
Ctrl + (left arrow) 95, 98, ME, NT, 2000, XP, Vista Move one word to the left at a time.
Ctrl + (right arrow) 95, 98, ME, NT, 2000, XP, Vista Move one word to the right at a time.
Shift + Ins 95, 98, ME, NT, 2000, XP, Vista Same as Ctrl + v
Shift + Delelte (or Del) 95, 98, ME, NT, 2000, XP, Vista Cut. Or permanently delete selected item(s) on Windows Explorer.
F1 95, 98, ME, NT, 2000, XP, Vista Help.
Home 95, 98, ME, NT, 2000, XP, Vista Jump to the beginning of the line or page.
Ctrl + Home 95, 98, ME, NT, 2000, XP, Vista Jump to the beginning of the document or page.
End 95, 98, ME, NT, 2000, XP, Vista Jump to the end of the line or page.
Ctrl + End 95, 98, ME, NT, 2000, XP, Vista ump to the end of the document or page.
Shift + Home 95, 98, ME, NT, 2000, XP, Vista Set selection (highlight) from current position to beginning of the line or page.
Shift + End 95, 98, ME, NT, 2000, XP, Vista Set selection (highlight) from current position to end of the line or page.
Shift + (left arrow) 95, 98, ME, NT, 2000, XP, Vista Set selection (highlight) from current position to the left, one character at a time.
Shift + (right arrow) 95, 98, ME, NT, 2000, XP, Vista Set selection (highlight) from current position to the right, one character at a time.
Shift + (down arrow) 95, 98, ME, NT, 2000, XP, Vista Set selection (highlight) from current position to the next line down.
Shift + (up arrow) 95, 98, ME, NT, 2000, XP, Vista Set selection (highlight) from current position to the next line up.

WINDOWS XP SECRETS - HIDDEN SECRETS UNVEILED!

Windows XP Secrets

Notepad Secrets
Create a log
  1. Open Notepad
  2. On the very first line, type in ".LOG" (without quotes) then press Enter for a new line
  3. Now you can type in some text if you want, then save the file.
  4. Next time when you open the file, notice its contents. Notepad automatically adds a time/date log everytime you open the file.
Text becomes unreadable
  1. Open Notepad
  2. On the very first line, type in "dont eat the donut" (without quotes) then save and close the file. Note: the file should have only one line of the text above.
  3. Now, open the same file. You'll notice the text becomes unreadable squares. (try this with different text with the same format and length).
Paint Secrets
Create a trail image
  1. Open Paint, then open an image.
  2. Right-click on the image and select "Select All"
  3. Now hold the "Shift" key and move the image around. The image will be drawn with trail.
10x Zoom
  1. Open Paint, then open a small image.
  2. Select the zoom "Magnifier" tool.
  3. Windows Paint lists out the zoom options from 1x to 8x, but there is a 10x...
  4. After selecting the Magnifier tool, point the mouse right at the border line right under "8x" and left-click. There you go.. the hidden 10x.
Other Secrets
Where is the relaxing music that you've heard during Windows XP Installation?
  1. The file is in:
    C:\Windows\system32\oobe\images\title.wma
Game Secrets
Solitaire: Instant Win
  1. Press Alt + Shift + 2 to instantly win
Solitaire: Draw only 1 card (instead of 3)
  1. Hold down Ctrl + Alt + Shift then click on unopen cards to draw.
FreeCell: Instant Win
  1. Hold down Ctrl + Shift + F10 while playing, then click Abort.
  2. Now move one card.
FreeCell: Hidden Game Modes
  1. Go to "Game" menu choose "Select Game"
  2. Here you can choose from game mode 1 to 1,000,000. But -1 and -2 will also work (hidden modes)
Hearts: Show All Card
    Warning! this requires a modification on your registry. Be sure you follow the steps carefully. Damage your registry might damage your Windows.
  1. Open the "Registry Editor" by: "Start" >> "Run" then type "regedit" and press Enter
  2. Expand to HKEY_CURRENT_USER\Software\Microsoft\Windows\CurrentVersion\Applets\Hearts
  3. Right-click on the right panel and create a new String value with the name "ZB"
  4. Double-click to open this key "ZB" to edit its value. Then enter "42" and close the Registry Editor.
  5. Start Hearts and Press Ctrl + Alt + Shift + F12 to show all the cards
Minesweeper: Stop The Timer
  1. When you start to play a new game, the timer is ticking...
  2. Press Windows Key + D to show desktop.
  3. Now come back to the game by selecting it from the taskbar. The timer is stopped.
Pinball
  1. Unlimited Balls: Type bmax at a new game to get unlimited balls (no notification).
  2. Extra Balls: Type 1max at a new game to get extra balls.
  3. Gravity Well: Type gmax at a new game to activate Gravity Well.
  4. Promotion: Type rmax at a new game or while playing to get instant promotion and raising rank.
  5. Extra points with partial shots: Partially shot the ball just to pass the yellow light bars. There are 6 bars. With the first bar, you'll get 15,000 points, 2nd: 30,000,...
  6. Extra points with partial shots: Partially shot the ball just to pass the yellow light bars. There are 6 bars. With the first bar, you'll get 15,000 points, 2nd: 30,000,...
  7. Test Mode: Type hidden test with a new ball or new game. Now you can use your mouse to drag and move the ball where you want.

HOW TO CREATE A PASSWORD-PROTECTED FOLDER WITHOUT USING SOFTWARE


HOW TO CREATE A PASSWORD-PROTECTED FOLDER WITHOUT USING SOFTWARE


Hello everyone, Today we will see how to create password protected Folders without software.
Securing personal files/softwares cannot be guaranteed in a situation whereby more than one person is permitted to make use of a computer.


In this case,it is very necessary to ensure all sensitive/personal documents are kept hidden from the view of such users.But how can you do that without a software?
Well,here’s an easy way to it.
So,if you think there’s a file/folder you’d like to keep hidden from the reach of others,just follow the steps below.

How To Secure Files/Folders Without Software

Create a new folder and create a new ‘Text Document’ in it by right-clicking and selecting ‘New’ » ‘Text document’.
Copy – Paste the following code snippet in the text document


cls @ECHO OFF title Folder Private if EXIST “Control Panel.{21EC2020-3AEA-1069-A2DD-08002B30309D}” goto UNLOCK if NOT EXIST Private goto MDLOCKER :CONFIRM echo Are you sure you want tolock the folder(Y/N) set/p “cho=>” if %cho%==Y goto LOCK if %cho%==y goto LOCK if %cho%==n goto END if %cho%==N goto END echo Invalid choice. goto CONFIRM :LOCK ren Private “Control Panel.{21EC2020-3AEA-1069-A2DD-08002B30309D}” attrib +h +s “Control Panel.{21EC2020-3AEA-1069-A2DD-08002B30309D}” echo Folder locked goto End :UNLOCK echo Enter password to unlockfolder set/p “pass=>” if NOT %pass%== password here goto FAIL attrib -h -s “Control Panel.{21EC2020-3AEA-1069-A2DD-08002B30309D}” ren “Control Panel.{21EC2020-3AEA-1069-A2DD-08002B30309D}” Private echo Folder Unlocked successfully goto End :FAIL echo Invalid password goto end :MDLOCKER md Private echo Private created successfully goto End :End


Locate `Password here` in the code above and change it to whatever password you want to use (Simple to remember,but hard for others to guess)

Now click on File » Save as and give it any name you so desire but with a .bat extension.
E.g : Lock.bat
Now,exit notepad and on getting to the new folder you created previously, you’ll see a “LOCKER” command.
Double-click on this file and a new folder will appear (Private OR Confidential)
Now,copy/move all you want to hide in this “Private/Confidential” folder and go back one step.
Double-click on the “LOCKER” command again and you’ll be greeted with something new.
Just press ‘Y’ as instructed and hit enter.
Immediately,the ‘PRIVATE / CONFIDENTIAL’ folder will disappear.Now,all your files & documents are secured in this hidden folder.
To undo hiding,double-click on this “Locker” command again and input the password you used above. Hit Enter and the hidden folder will re-appear..Now,that’s it.

NOTE:These files can still be sometimes accessed using the search,so it is highly recommended you rename your files before hiding them so as to ensure its maximum security.

If you think this article is useful to you plz share it, tweet about it and like us on FACEBOOK
 
Thank you :)

HOW TO CONVERT TEXTS TO AUDIO

HOW TO CONVERT TEXTS TO AUDIO

HI friends, I am back with an awesome trick Which will help you to Convert Any Text to Audio Without Any Software. Isn’t it Interesting? Yes it is.
With this trick you can convert any text to Audio without any use of third party software.

Steps To Convert Text To Audio without any software:

Step 1. First of all Open notepad then copy the below text and paste it in notepad.
Dim msg, sapi
msg=InputBox(“Enter your text for conversion– “,”By computer freaks”)
Set sapi=CreateObject(“sapi.spvoice”)
sapi.Speak msg
Step 2: After Pasting the Above Code in notepad, Save the file with the name Text To Audio.vbs.
remember the name of the file should be with .vbs extension.
its nothing but a Vbscript File.

Step 3: Now double click on the saved file and you will see a box like the below;

Step 4: Type your text which you want to hear, and then press OK. Thats it. All Done.
You can hear it load and clear.

Isn’t it amazing ?

I know you will like it for sure. Keep visiting and stay updated.

On the other hand if you would like to do this with a help of a software then you can try the TextAloud With AT&T Natural Voices (Windows Software).

Product Features

  • Sit back and relax while your PC reads to you. Proofread your own writing .
  • Save text to MP3 for portable audio players. Listen to that report while you’re on the treadmill.
  • Find help for someone with a reading disability. Help a senior citizen or someone with low vision.
  • Listen to an eBook during your commute. Add some spice to your PowerPoint presentations. Turn your iPod into a tax write-off.
  • Reduce eye strain from too much reading. Take some reading along for your daily walk or run. Find a great new tool to study for exams. Listen to text read in other languages.
You can get the software here:

TextAloud With AT&T Natural Voices (Windows Software)

HOW TO USE WHATSAPP ON PC FOR WINDOWS AND MAC


How to Use Whatsapp on PC for Windows and Mac

Whatsapp is one of the leading social messenger on Mobile but unfortunately if you dont own a Smart phone then you might not be able to use whatsapp. But don’t worry today we Will learn How to use Whatsapp On PC as well.

GOOD NEWS! You can Use it On both Windows and Mac.

Let us See How to Use Whatsapp On Windows and Mac PC.

To Run Whatsapp on Pc, there will be need to use the following emulators;
  • Android Emulator: Android Emulator Helps us to Run Whatsapp on PC. 

  • Step 1: Youwave And Bluestack Are the Two Android Emulator which enable us to Run Whatsapp or any other Android App on PC. 
  • Step 2: If you Go for Bluestack then Download and install it, then run the Bluestack and Click on "Apps "
  • Then Click on the Tab ” Social ” and select ” Whatsapp ” and Install it. 
  • Step 3: If you Go for Youwave which I am Using On My PC then just download  and install.


Please dont forget to comment and share!!!

Windows Hidden Tips and Tricks - Manually

WINDOWS TIPS AND TRICKS


To boost performance of your PC or to increase RAM virtually,
Right click on My Computer Icon on Desktop
  • Go to Properties
  • Go to Advanced
  • Go to Performance - Settings
  • Go to Advanced
  • Go to Virtual Memory - Change
Keep the initial size same as recommended and maximum size double of it then restart your system.
It will improve speed of windows and you can play some games which require higher RAM.

To Minimise all the application and running windows press the "Windows + M " key together. 

To Lock a folder in windows XP without any software. Follow the steps Below. 

  • Make a Folder in C drive rename it as "abc" without quotes.
  • Now open Command Prompt from Start Menu.
  • Type "attrib +s +h C:\abc" without quotes and press enter.
  • This command will Make your folder invisble and it can not be seen even in hidden files and folders
  • To make it visible again type "attrib -s -h C:\abc"
  • You can lock any other folder also by changing the location C:\abc to address of your folder

Please, do not forget to comment and share!!!


Apple updates

Apple updates MacBook Pro, but where’s the Retina MacBook Air?

    Macbook Pro

Share This article

At long last, Apple has finally gotten around to updating its line of Retina MacBook Pros. The CPUs are getting a nice boost across the board, and the amount of RAM on offer has doubled. Even better, the high-end and low-end MacBook Pros have dropped in price by $100 each. Hardware bumps and price dips are certainly welcome, but how long are we going to have to wait around for Apple to release iMacs and MacBook Airs with Retina displays?
With today’s update in place, all of the 13-inch Retina MacBook Pros ship with a minimum of 8GB of RAM, and the 15-inch models exclusively ship with 16GB. Unfortunately, no 32GB or 64GB options were introduced. As far as the processors go, the low-end 13-inch Retina model comes with a Haswell 2.6GHz dual-core Core i5, but it can be upgraded to a 3.0GHz dual-core Core i7 chip. On the other hand, the 15-inch Retina MacBook Pro starts with a Haswell 2.2GHz quad-core Core i7 CPU, and can be upgraded to a 2.8GHz quad-core Core i7.
The graphics processors seem to be unchanged with the 13-inch models still rocking integrated Iris graphics, the 15-inch models sporting integrated Iris Pro graphics, and the top-of-the-line model offering a dedicated Nvidia GeForce GT 750M GPU as well. As far as I can tell, the only other notable difference is the option to upgrade select models to a full terabyte of internal flash storage. Of course, that will cost you an additional $500 on top of the 512GB version, so the extra space probably isn’t worth the price just yet.
Macbook Air More than anything, this update leaves me wondering about the long-rumored Retina-capable MacBook Air and iMac. It’s been over two years since the first Retina MacBook Pro was released, and we haven’t heard a peep out of Apple regarding the rest of its lineup. Offering a 27-inch Retina display for an iMac would undoubtedly be a costly affair, but that’s Apple’s bread and butter — premium devices at a premium price. What’s the hold-up?
With the rise of 4K (and 5K) displays for the living room happening so quickly, it seems inevitable that these high-res displays will have to start working their way into Apple’s product line. When you look at the 11-inch MacBook Air’s paltry 1366×768 resolution compared to the 2048×1536 display in the 10-inch iPad, it’s actually a bit embarrassing.
In fact, the MacBook Air’s display is a lot closer to the 1136×640 display included with the four-inch iPhone than the high-res displays commonly found in comparable 10-inch tablets. If Apple actually releases 4.7-inch or 5.5-inch iPhones this year without a Retina update for the MacBook Air, the iPhone’s resolution will absolutely dwarf the resolutions found in its ultra-thin laptops. Frankly, that’s just too surreal for me to accept as a possible outcome. There must be an update planned for this fall.

DIFFERENCES BETWEEN TFT AND LCD

DIFFERENCE BETWEEN TFT AND LCD.


DIFFERENCE BETWEEN TFT AND LCD.
This is a common question when have been asked about several times by many people. Every body wants to know that what is the difference between a LCD and TFT. So i figured out, i should answer this question for anyone who has doubts.

LCD stands for Liquid Crystal Display... and 
TFT stands for Thin Film Transistor.

TFT is not really different from LCD. It comes from the family of LCD technology. We can say that it is a modern version of the LCD Technology. A TFT provide a well improved image quality. 
There are two typs of display quality. 1st one is Matty and 2nd is Grossy. Matty display is called LCD and Grossy display is called as TFT. LCD and TFT consumes less power energy as compared to CRT (Cathode ray tube).
Now a days TFT has been used for mobile phone devices, projectors, nevigation systems as well as TVs and computer monitors.

INCREASE SPEED OF HARD DISK

INCREASE SPEED OF HARD DISK


INCREASE SPEED OF HARD DISK
It is common observation that some times our computer slows down due to low performance of hard drive. This problem happens due to the slow performance or poor speed of hard drive. When we say about poor performance, actually we mean, poor speed of reading/writing of hard drive. This problem can be solved by increasing the hard drive speed. Follow these steps to solve your problem.


Click Start menu and select run.
Now type (sysedit.exe) in run and press enter.
System configuration editor will appear.
Here you can see some multiple windows but you will select (system.ini).
This window contains a line (386enh)
Now after this line type (irq14=4096)
Now close this window and save it.
Reboot your computer now.
You will surely feel better performance of your computer.
Enjoy.

Crowdsourced RNA designs outperform computer algorithms


RNA DESIGNS OUTPERFORM COMPUTER ALGORITHM

An enthusiastic group of non-experts, working through an online interface and receiving feedback from lab experiments, has produced designs for RNA molecules that are consistently more successful than those generated by the best computerized design algorithms, researchers at Carnegie Mellon University and Stanford University report.
Moreover, the researchers gathered some of the best design rules and practices generated by players of the online EteRNA design challenge and, using machine learning principles, generated their own automated design algorithm, EteRNABot, which also bested prior design algorithms. Though this improved computer design tool is faster than humans, the designs it generates still don't match the quality of those of the online community, which now has more than 130,000 members.
The research will be published this week in the Proceedings of the National Academy of Sciences Online Early Edition.
"The quality of the designs produced by the online EteRNA community is just amazing and far beyond what any of us anticipated when we began this project three years ago," said Adrien Treiulle, an assistant professor of computer science and robotics at Carnegie Mellon, who leads the project with Rhiju Das, an assistant professor of biochemistry at Stanford, and Jeehyung Lee, a Ph.D. student in computer science at Carnegie Mellon.
"This wouldn't be possible if EteRNA members were just spitting out designs using online simulation tools," Treuille continued. "By actually synthesizing the most promising designs in Das' lab at Stanford, we're giving our community feedback about what works and doesn't work in the physical world. And, as a result, these non-experts are providing us insight into RNA design that is significantly advancing the science."
RNA, or ribonucleic acid, is one of the three macromolecules essential for life, along with DNA and proteins. Long recognized as a messenger for genetic information, RNA also may play a much broader role as a regulator of cells. Understanding RNA design could be useful for treating or controlling diseases such as HIV, for creating RNA-based sensors or even for building computers out of RNA.
In the research being reported this week, the researchers tested the performance of the EteRNA community, EteRNABot and two state-of-the-art RNA design algorithms in generating designs that would cause RNA strands to fold themselves into certain shapes. The computers could generate designs in less than a minute, while most people would take one or two days; synthesizing the molecules to determine the success and quality took a month for each design, so the entire experiment lasted about a year.
In the end, Lee said, the designs produced by humans had a 99 percent likelihood of being superior to those of the prior computer algorithms, while EteRNABot produced designs with a 95 percent likelihood of besting the prior algorithms.
"The quality of the community's designs is so good that even if you generated thousands of designs with computer algorithms, you'd never find one as good as the community's," Lee said.
When the project began, players were asked to design RNA that folded into specific shapes selected by the Das lab. Thanks to technological breakthroughs that now enable Das and his team to synthesize a thousand design sequences each month instead of the original 30, EteRNA has become an open research project to which researchers from labs around the world can submit design challenges.
Though EteRNA players may not be scientifically trained, they nevertheless have instincts that, when bolstered by the lab experiments, can lead to new insights. "Most players didn't have tactical insights on RNA designs," Lee said. "They would just recognize patterns -- visual patterns."
"Scientifically, not all of these rules initially seemed to make sense, but people who were following them did better," he noted.
One design rule generated by the players involves "capping." RNA consists of long sequences of pairs of nucleotides and usually the easiest way to create a sequence or "stack" that won't rip itself apart when synthesized is to fill it with guanine-cytosine (GC) pairs. But too many GC pairs can produce some unexpected shapes when synthesized -- "It's like doing origami with a cardboard box," as one player put it.
Lee said the players found a solution by putting the GC pairs only at the end of the stack -- "capping" -- and filling the rest of the stack with adenine-uracil pairs.
The project is now looking at expanding its design regimen to include three-dimensional designs. They also are developing a template that researchers in other fields can use to turn scientific projects into online challenges.
EteRNA receives financial support from the National Science Foundation, the National Research Foundation of Korea, Google and the W.M. Keck Foundation.

How to enable F8 to start Safe mode in Windows 8

How to enable the F8 key to start Safe Mode in Windows 8

Windows 8 introduced a new boot loader that decreased the time that it takes Windows 8 to start. Unfortunately, in order to do this Microsoft needed to remove the ability to access the Advanced Boot Options screen when you press the F8 key when Windows starts. This meant that there was no easy and quick way to access Safe Mode anymore by simply pressing the F8 key while Windows starts. Instead in order to access Safe Mode, you would need to either start Windows 8 and then tell it to restart into safe mode or for Windows to fail to start, where you could then tell Windows reboot again into safe mode. Regardless of how you did, it became a 2-3 step process to access the Windows 8 Safe Mode rather than a 1-step process that we have become familiar with.
In my opinion having access to diagnostic tools quickly and easily is more important than shaving some seconds off of the time it takes Windows to starts. With that said, this tutorial will explain how to enable the F8 key in Windows 8 so you can quickly and easily access the Safe Mode boot options and other diagnostic tools. As a bonus, by enabling this option on a dual-boot system with multiple operating systems, you will now find it easier to select the operating system you wish to use when you start your computer.
To enable the F8 key in Windows 8 you will first need to open an elevated command prompt. To do this you can follow the steps in this tutorial:

How to open an Elevated Command Prompt in Windows 8

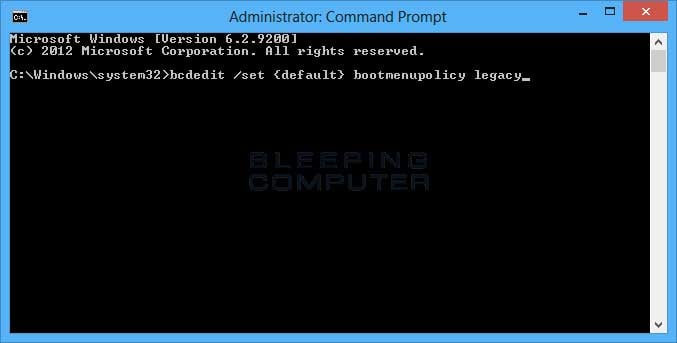
When the elevated command prompt is open you will be at the C:\Windows\System32> prompt. To enable F8 in Windows 8 you need to type the following in the command prompt and then press the Enter key.
bcdedit /set {default} bootmenupolicy legacy
Once you enter the above text, your command prompt should look like:

Enabling F8 key in Windows 8

Once the command has been enter as shown above, press the Enter key on your keyboard. If you entered the command correctly, Windows will report that the "The operation completed successfully.". You now need to restart your computer for the change to go into effect. With this settings configured, you can now press F8 while Windows 8 starts in order to access Safe Mode and other Advanced Boot options.
If you would like to disable the F8 key and go back to the original Windows 8 setting you can open an elevated command prompt and enter the following command:
bcdedit /set {default} bootmenupolicy standard
Once you enter the above command, press Enter on your keyboard. If you entered the command correctly, Windows will report that the "The operation completed successfully." and you should now restart your computer. The F8 key will now be disabled in Windows 8.
I would like to thank Melanie for posting this tip as a comment in our Windows 8 Safe Mode tutorial. If you have any questions regarding this process, please feel free to ask us in through mail... airscholar@gmail.com