Subscribe For Free Updates!

We'll not spam mate! We promise.

Showing posts with label Pc Maintenance tips. Show all posts

How to Improve Your Computer’s Performance

Tips for Speeding Up Your PC

computer tipsFew things are as frustrating as dealing with a slow, sluggish computer. When a computer is brand new, it works wonderfully well. Over time, though, its performance can slowly begin to worsen. This happens for a number of reasons, but the biggest culprits are things like spyware, adware and other computer threats that are unwittingly downloaded along with other content while online. You don’t have to download thousands of MP3s, movies or other items to experience these problems, either – nobody is immune to them. Instead of accepting the situation, there are plenty of techniques and strategies that you can use to make it better – a few of the best ones are outlined below.


Strategy #1: Clean Your Computer’s Windows Registry

The biggest cause of slow, sluggish PC performance is errors and problems within its Windows registry. Adware, spyware and other threats usually target the registry, damaging or misplacing important files within it. When it comes to PC cleaning, a daily Windows registry cleaning should be at the top of your list of priorities. However, this should never be done manually – there are too many opportunities for major errors that could seriously damage your PC’s operating system. Instead, invest in a high-quality Windows registry cleanup program and configure it to run once per day – you won’t believe the difference that it makes.

Strategy #2: Remove Unneeded Files

Every time you log on to the Internet or otherwise use your computer, temporary files are generated. They are usually only needed once; however, they don’t disappear on their own. Instead, they accumulate over time until they are cluttering up your computer’s file system and affecting its performance. While it’s possible to remove these files one-by-one, it’s much easier and quicker to use a PC cleaning tool that’s designed for the purpose. Try to do so about one time per week to keep your computer humming along with ease.

Strategy #3: Remove Unneeded Programs

Like many people, you probably download and try out many different programs each month. How many of them do you actually end up using on a regular basis? Chances are, not very many of them. By getting into the habit of uninstalling unused and unneeded programs, you can keep your computer’s file system a lot less cluttered. In turn, your PC’s performance will improve dramatically. You can optimize your computer in this way by using its Add/Remove Programs feature. Its location varies by operating system, but you should be able to find it somewhere in the Control Panel.

Strategy #4: Empty the Recycle Bin

When you click “delete” on a file or a program, it doesn’t go away for good – not immediately, anyway. Instead, it sits in a kind of purgatory in your computer’s Recycle Bin. As things pile up in the Recycle Bin, your computer can start exhibiting some very annoying problems. If sluggish startups and frequent crashes are occurring with increasing frequency – and your computer’s recycle bin is very full – go ahead and empty it. From then on, get into the habit of doing so about one time per week. This small but important strategy can make a huge difference.

Strategy #5: Perform a Disk Defragmentation

Windows isn’t very efficient when it comes to storing files. It actually splits them up, depositing them into whatever spaces are available. The more spaced apart the pieces of a file are, the harder your computer has to work to make them run. The Windows disk defragmentation system tune-up utility works to piece all of those files back together again. The process is a long one, though, and only needs to be done about four times per year. Set it up to run automatically once every three months. By doing so, you’ll be able to keep your computer running in tiptop shape.
When it comes to keeping your computer running optimally, small but regular maintenance is the best way to go. Protecting your PC only does so much; even the most careful Internet users in the world unintentionally download malicious software from time to time. By using basic system tune-up tools, cleaning your computer’s Windows registry regularly, performing regular file-cleaning maintenance and otherwise optimizing your PC, you should be able to keep it in like-new condition for a lot longer. Even if your computer has been performing slowly for some time, beginning this regimen is sure to produce results. In the end, you’ll be able to enjoy a computer that flies along – instead of one that spins its wheels.

How to Password a folder in Windows XP, Windows 7 and later versions and MAC

Method 1 of 3: Windows XP

  1. Protect Folders With Passwords Step 1 Version 2.jpg
    Create a compressed folder. Right-click on your desktop or whatever location you’d like your folder to be. Select New, then click Compressed (zipped )Folder. This will make a new .zip file that you can add files to as if it were a folder.Protect Folders With Passwords Step 2 Version 2.jpg
  2. 2
     
    Move your files. Copy and paste or click and drag your files into the new .zip file. You can move as many files and folders over as you’d like.
  3. Protect Folders With Passwords Step 3 Version 2.jpg
    3
    Add a password. Open the .zip file. Click File, then select Add a Password. Enter a password of your choosing, then enter again to confirm it. You will now need this password every time you access the .zip file.
    • Other users will still be able to see the contents of the file, but they will not be able to access them without the password.
  4. Protect Folders With Passwords Step 4 Version 2.jpg
    4
    Delete the original. Once the .zip file is created, you will have two copies of your folder: the original and the .zip file. Delete or move your original so that it cannot be accessed.  
 

Method 2 of 3: Windows Vista and Later

Protect Folders With Passwords Step 5 Version 2.jpg
  1. 1
    Download and install a third-party compression software. 7-zip is one of the most popular free options available. This guide will be based on using 7-Zip.
  2. Protect Folders With Passwords Step 6.jpg
    2
    Create the compressed file. Select the folder that you want to password protect. Right-click and select 7-Zip from the menu. From the second menu, select “Add to archive…” This will open 7-Zip.
  3. Protect Folders With Passwords Step 7.jpg
    3
    Adjust the settings. You can rename the file that will be created. Choose .zip from the “Archive format” menu if you want the folder to be compatible on systems without 7-Zip installed.
  4. Protect Folders With Passwords Step 8.jpg
    4
    Add a password. On the right side of the 7-Zip window, there will be two fields to enter and confirm a password for the file. You can also select your form of encryption, and whether or not you want the names of the files encrypted as well. Click OK when you are done.
  5. Protect Folders With Passwords Step 9.jpg
    5
    Delete your original. Creating a compressed file will leave you with two copies of your data: the original and the compressed file. Delete or move the original so that it cannot be accessed.  
 

Method 3 of 3: Mac OS X

43853 10.jpg
  1. 1
    Create an encrypted sparse image. To password protect files and folder in Mac OS X, you will be creating an encrypted disc image, which you will mount whenever you want to access the files. You will specify the size that you want the image to be, but it will only occupy as much space on your hard drive as the contents do.
  2. 43853 11.jpg
    2
    Open the Disk Utility tool. You can find this in the Utilities folder which is in the Applications folder. Once the program is running, click File, then select New. Pick Blank Disk Image. A new window will open; choose Sparse Disk Image from the Image Format menu.
  3. 43853 12.jpg
    3
    Choose a size. There will be a list of predetermined sizes that you can choose from, or you can enter your own with Custom. Pick a size that is larger than the size of all the files you are adding, that way you can add more later if you’d like.
  4. 43853 13.jpg
    4
    Choose your encryption. You’ll have a choice between 128-bit or 256-bit. 128-bit AES encryption is very strong, and most users won’t need anything higher than that. Encrypting in 256-bit can take significantly longer.
  5. 43853 14.jpg
    5
    Name the image. This is the name that will appear in your system. Click Create. You will be prompted to enter and confirm a password.
    • Uncheck the Remember Password option to make sure that the password needs to be entered every time the image is accessed.
      43853 14b1.jpg
  6. 43853 15.jpg
    6
    Fill the image. Once you create the image, the file and mounted image will both appear. Add files to the mounted image, then drag it to the trash can to unmount it. When you want to access them again, open the image file. You will be prompted for the password and then the image will be mounted.

How to Protect Your Computer From Viruses

How to Protect Your Computer From Viruses

computer security virus tipsWith millions of computer users browsing the web at any given time, there are plenty of targets for malicious coders. While computer experts don’t always know why coders choose to build harmful computer programs, the fact is that it happens all the time. Computer viruses can steal personal information, interfere with normal operations, attract spam and even shut down your computer’s hard drive. Protecting your computer is critical for browsing success.

Start With the Basics

Most computer systems come with security features already in place. For example, the Windows operating system is packaged with Microsoft Windows Security Center. When you first open, boot up and register a new computer, you should make sure that this program is functioning. It will give basic protection against spyware, viruses and malware. In addition, a basic firewall is built into this program, providing additional protection and stops for potentially harmful programs. Upon activation, don’t be surprised if your security system needs immediate updating. Software that protects your computer needs regular and consistent updating to stay useful. Viruses are constantly being generated and the several-month lag between when your computer was made and when you first started using it can mean that the database the security system is loaded with is severely out-of-date.

Upgrade to Meet Your Needs

Many people operate computers for a long time with only basic protection in place. However, heavy computer users or those who have risky browsing habits can sometimes benefit from upgrading their virus, spyware and malware protection, as well as using a fuller-featured firewall; this is especially important if you use a networked computer system. Basic or free virus protection will still scan and update for viruses. Paid programs, however, offer more features, including ease-of-use and convenience features. The most important thing is to verify the publisher and make sure you are getting what is promised. Most well-known virus protection programs, such as AVG and Norton Security, have reviews available to help you make your choice.

Learn About Spyware Risks

Spyware creates risks that many computer users are not aware of. If you are only protecting against viruses, you could be leaving your computer open to damage. Most people are familiar with spyware that initiates and attracts annoying ad programs. Spyware, however, can be much more malicious as well. Your shopping habits can be tracked by spyware. While not exactly harmful, some people consider this a breach of privacy. The worst spyware programs interfere with normal operations and can even track what you type, sending personal information to people who want to steal your identity. Some spyware redirects your browser to different web addresses, increasing your risks of virus infection and fraud.

How Viruses Work

The main difference between spyware and viruses is how they are spread. A virus reproduces itself and attaches to any document that the computer sends, while spyware can be stored as a cookie or tracking code. A virus is most often found traveling with a piece of computer software, such as a document, picture or piece of music. When dealing with email, it is necessary to open an attachment to become infected, indicating that, in most cases, the computer user must somehow invite the malicious software to replicate on their system. Of course, most people have no idea it is there or what is happening. Some of the sneakiest and most harmful viruses actually masquerade as virus protection software, making them extremely hard to detect. Because of this, it’s crucial to be familiar with your particular virus protection program and know what it looks like and what the normal scripts and prompts are during operation. Viruses do some of the same things that spyware does; they just accomplish it differently. An active virus can steal personal information, generate ads or shut down your system, including the very virus protection programs that can fix the issue.

Take Steps For Protection

Like anything, the best way to protect against viruses is to be educated. Become familiar with what malicious software may look like. If you get an email or are asked to download a file that you don’t recognize or looks suspicious, do your homework. Research virus protection, spyware, malware and firewall programs and use them to their fullest capacity. Set the software to update and scan automatically to make sure that the system is constantly monitored. In addition, regularly check on the databases published by various virus protection services; many will provide lists of symptoms and risks, as well as the standard way the file gains access for no cost to the public.

Selecting Parts for a Computer

Selecting Parts for a Computer

A custom-built computer can be the best compromise of price and performance.

A custom-built computer can be the best compromise of price and performance. A computer isn't a single, simple device. It's actually an ecosystem of multiple devices from different manufacturers, even if every part you see has the same brand name on it. That's because even the biggest computer makers purchase their parts from the same companies whose products fill your local electronics store. If you're willing to put a bit of time into research, you can select specific components for a computer that meets your needs exactly. Ideally you'd just buy the largest and fastest of everything, but in the real world that's an expensive option.

Motherboard

Your computer's motherboard, processor and memory are its core components. Choose a motherboard first, because its speed, sockets and expansion options affect your remaining choices. High-performance motherboards have more slots for RAM and expansion cards, and can accommodate the most powerful processors. They also have a faster system bus, meaning they transfer data more quickly between the CPU and RAM. Other motherboards are designed for compact size and low power consumption, or varying levels of price and performance. Some have graphics and sound built in, while others assume you'll want to choose your own.

CPU and RAM

Your processor and RAM work closely to provide your system with most of its performance. Intel and rivals AMD manufacture a range of dual- and quad-core processors, varying widely in processing power and electrical consumption. Your choices are determined by your motherboard's processor socket, which will support a specific family of processors. In general, quad-core processors are more powerful than dual-core, but unless you run high-end games or powerful application software, you might see little benefit from the added cost. RAM should match the bus speed of your motherboard, and always buy more than you think you'll need.

Major Subsystems

After those core components, your video and storage subsystems have the biggest impact on your system. Some motherboards include a video chipset, which will work fine for light-duty uses such as Web browsing and word processing. For games and other image-intensive programs, it's better to have a powerful standalone graphics card. A top-end graphics card can cost more than a basic computer, so exercise restraint unless you definitely need the horsepower. Your hard drive is also an important factor in overall performance. Larger is better, as a rule. Compare your options against what's included in mainstream computers, and buy at least one size larger.

Other Components

With your system's main components decided, it's time to pick the remaining pieces that round out a complete system. A keyboard and mouse are fundamental choices. Pick ones that feel good under your hands, because you'll use them a lot. Ergonomic keyboards can help prevent repetitive stress injuries. A wireless keyboard and mouse cut down on cord clutter, though they'll need batteries. A DVD or Blu-Ray drive adds movie capability, and makes it easier to install software. They'll also let you burn files to blank DVDs for storage. Flat-screen monitors in the 19- to 21-inch range are inexpensive, and high-powered graphics cards can handle much larger screens at high resolution.

Expansion and Connectivity

Older computers had a range of ports for connecting to various devices. Those have mostly been replaced with USB slots, so you'll want lots of those for connecting to printers, cameras and the dongles for wireless accessories. Most computers also have speaker and microphone jacks, and will support full surround-sound speaker sets. Add a webcam for video chat or phone calls. Most motherboards include a wired network card, requiring a cable to connect to your modem or router. If you want the freedom of wireless connectivity, you'll need to install a wireless network card into one of the motherboard's expansion slots.

Computer code in films

Computer code in films: hidden meanings or irrelevant nonsense?

From the the scrolling text in The Terminator to the hacking methods in The Girl with the Dragon Tattoo, one programmer is on a mission to crack movie codes
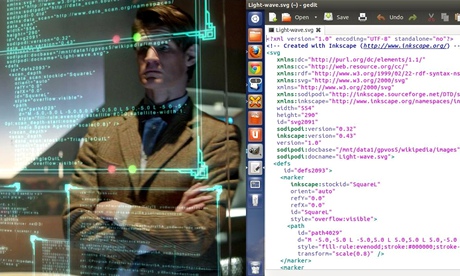
The Doctor examinines an SVG file taken from Wikipedia
The Doctor examines an SVG file taken from Wikipedia.
Ever wondered what those Matrix-style green holographic codes that flicker across computer screen in films actually mean? You know, those seemingly complex algorithms in The Fifth Estate and unbreakable cryptograms in Doctor Who? Well, programmer John Graham-Cumming has the answer.
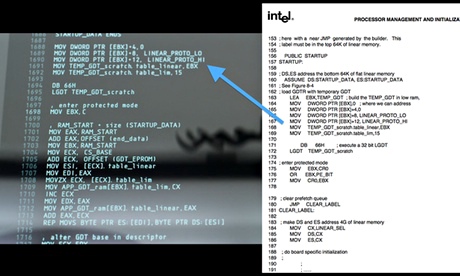
"I was watching the film Elysium and some coding came up as the space station is rebooted, and I thought: 'This is really familiar', so I tracked it down," explains Graham-Cumming, who started coding at the age of 13 on his BBC Microcomputer and is now a well-known blogger and programmer. "It turns out that the code is actually taken directly from the Intel software developer's manual, which I found amusing. So I tweeted that and got hundreds of responses." Last Friday, he launched a Tumblr to compile more examples; by Monday morning it already had 11,000 followers and Graham-Cumming was inundated with suggestions for movie codes to crack.
Code from Elysium Code from Elysium. Photograph: John Graham-Cumming/Tumblr The process of identifying the sources of movie codes is actually quite simple. Graham-Cumming takes a screengrab and immediately gets a sense of whether the code is possibly legitimate or utter nonsense. If an unusual character or variable stands out, he picks it out and Googles it. In most cases, whether the codes is purporting to guide a missile or rifle through confidential databases, it's likely to be a pretty mundane cut and paste job.
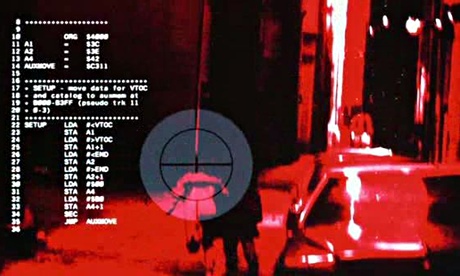
There are some real howlers. Graham-Cumming was tickled while watching Antitrust, a thriller about a wannabe Bill Gates: "I cracked up watching these computer nerds looking at code, nodding and saying: 'Whoa, this is great man,' when it was really the most basic Java script that is completely meaningless." In The Terminator, we see the world through T-800's head-up display, yet the scrolling text accompanying the crosshair in his vision is the harmless assembly code for an Apple-II. But the sources for fake coding just get better: in one episode of Doctor Who, Matt Smith looks intently at some hovering code, yet on closer inspection, it's the reference for a simple image file – a picture of a lightwave – lifted from Wikipedia.
Code in The Terminator Code in The Terminator Photograph: John Graham-Cumming/Tumblr Computer programmers must laugh when they see characters in films adjusting their thick-rimmed glasses, furiously typing, then gazing at a code that probably only says: "Hello world." Graham-Cumming finds it surprising, though, that these details, which might be central to a plotline, are rarely given more thought and attention by directors, particularly as plausible codes are so easy to find through open–source websites such as GitHub and SourceForge.
However, there are some impressive examples of programming detail. Jurassic Park was clearly ahead of its time: actors worked on realistic, high-performing Silicon Graphics computer systems and in one classic classic scene, teenager Lex Murphy logs on to the computer and exclaims: "It's a Unix system, I know this," which relates to a real operating system.
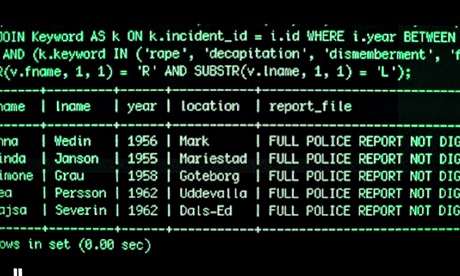
Code in The Girl with the Dragon Tattoo  
Code in The Girl with the Dragon Tattoo. Photograph: John Graham-Cumming/Tumblr More recently, The Social Network provided a visually compelling, technically authentic narrative about the process of programming. When Mark Zuckerberg, played by Jesse Eisenberg, types the commands for "facemash" using PerlScript, it is woven in with his explanation of the procedure in plain text and HTML on his blog. In David Fincher's The Girl with the Dragon Tattoo, heroine Lisbeth Salander is depicted as searching for files using the same process that real developers use. With the rise of high-definition screens and screen-capture tools, and with gadgets such as Google Glass increasingly likely to be used on screen, there will only be more opportunities for smart-ass code-reading. Directors take note.

How to Find Hidden Programs Running on My Computer

How to Find Hidden Programs Running on My Computer

Not all programs are proudly displayed on a tab on your Windows taskbar. Some are intentionally hidden from view because they act as legitimate background processes or services that don't require constant access via the taskbar. Some programs remain open but hidden from view, even after you close them. This is a common practice with peer-to-peer utilities that want to remain open, so other users can download shared files from your computer. Still other programs may be malicious spyware intent on capturing your information. Using the Windows Task Manager or Services tool will help track down active process and services, even if they are hidden from view.

Windows Task Manager

Step 1

Press "Ctrl-Shift-Esc" to open Windows Task Manager.

Step 2

Click the "Processes" tab.

Step 3

Scroll through the list to view active processes on your computer. This list displays visible and hidden programs. Look at the Name and Description to help identify the process. Additional information is commonly available by searching online for the process name.

Step 4

Right-click any active process and select "End Process" to end the program. Close Windows Task Manager.

Services Tool

Step 1

Click the "Start" button, type "services" and click "Services" from the search results.

Step 2

Click the "Status" column header to sort the list by status. Services listed as "Started" are currently running.

Step 3

Click any service and look at the left pane for a description. Although most services are installed by Windows, several programs add automatic services to this list.

Step 4

Right-click any service and select "Stop" to deactivate the service.

Tips

  • Always maintain an up-to-date virus and spyware scanner and regularly run scans. This will help prevent and remove hidden spyware and malware from your computer. Some persistent viruses may require booting from the virus scanner's bootup disc.
  • Some programs will run automatically again at startup. To stop them from running, press "Win-R," type "msconfig" and press "Enter" to run the System Configuration Utility. Click the "Startup" tab and uncheck any program to keep it from running at startup. Click "Apply" to save your settings. To stop services from running automatically, double-click the service to open its properties window. Click the "Startup Type" drop-down list and select "Disable" to disable it. Alternatively, select "Manual" to only run it when an action requires it. Click "Apply."

How to Reset Windows Password

Reset Windows Password

Forgot your administrator password? Don't panic, it happens to some other people too, and you have found the solution! The following instructions will show you step-by-step how to reset your local Windows password. This only works for local user accounts, however, not domain accounts.The password recovery tool from this page is written by Petter Nordahl-Hagen, and the original information, as well as the downloadable tool, can be found from his website. According to the author, this tool should work for Windows NT/2000/XP/Vista.
WARNING! Users who have EFS encrypted files on the Windows XP or Vista computers will loose access to the EFS encrypted files after recovery of your password!

Use this trick at your own risks
The tool to reset your password can be downloaded here.

I. Download the bootdisk:
  1. Download the bootdisk, which includes the password recovery tool here. The file contains the ISO CD image.
  2. Unzip (extract) the ISO file and burn it to a CD. Note that this is an ISO file, you must burn it to CD as an ISO image, not as a "data" file. If you're not sure how, see this article. Also, the image is bootable, you need to burn the image to a CD using the image burning feature; do not extract the contents of the ISO and burn them to the CD, you'll end up with a CD that can't boot!

II. Understanding the process:
  • You'll use the bootdisk created from the above steps to bootup your computer, which you want to reset your administrator password.
  • You'll be asked for things like: which drive is the boot drive, which path to the SAM file, etc.. but don't worry, details will be provided.
  • Once you have selected an account to reset the password, you'll need to type in a new password; however, it is highly recommended to use a BLANK password at this point, then you can change your password later in Windows.
  • Follow the prompts to the end. You'll need to save the changes at the end!

III. OK! Enough talking. Here are the steps:
  1. Startup your computer with the bootdisk created above. You should see a welcome screen following with a prompt:
    	boot:
    
  2. Just wait, the bootup process will continute automatically. Then you should see a screen similar to this:
    	=========================================================
    	. Step ONE: Select disk where the Windows installation is
    	=========================================================
    	....
    	NT partitions found:
    	 1 :   /dev/sda1    4001MB  Boot
    	 2 :   /dev/sda5    2148MB
    	
    	Please select partition by number or
    	a = show all partitions, d = automatically load new disk drivers
    	m = manually load new disk drivers
    	l = relist NTFS/FAT partitions, q = quit
    	Select: [1]
    
  3. Notice the last line "Select: [1]" which shows the [1] as default selection because the tool detected the bootup partition is [1]. This might be different on your own machine, so you should review the list shown under "NT partitions found:". The partition with the word "Boot" should be selected.

  4. Hit Enter once you confirm the selection. You should see a similar screen as follows:
    	=========================================================
    	. Step TWO: Select PATH and registry files
    	=========================================================
    	....
    	What is the path to the registry directory? (relative to windows disk)
    	[windows/system32/config] :
    
  5. Notice the last line "[windows/system32/config]" which shows the default path. This was also detected by the tool. If the path is correct, hit Enter, or if you wish to enter a different path, enter it now then hit Enter.
    Here are the paths for different versions of Windows:
    - Windows NT 3.51: winnt35/system32/config
    - Windows NT 4 and Windows 2000: winnt/system32/config
    - Windows XP/2003 (and often Windows 2000 upgraded from Windows 98 or earlier): windows/system32/config

  6. Once you hit "Enter", you should see the next screen similar to the following:
    	-r--------    1 0        0          262144 Jan 12 18:01 SAM
    	-r--------    1 0        0          262144 Jan 12 18:01 SECURITY
    	-r--------    1 0        0          262144 Jan 12 18:01 default
    	-r--------    1 0        0         8912896 Jan 12 18:01 software
    	-r--------    1 0        0         2359296 Jan 12 18:01 system
    	dr-x------    1 0        0            4096 Sep  8 11:37 systemprofile
    	-r--------    1 0        0          262144 Sep  8 11:53 userdiff
    
    	Select which part of registry to load, use predefined choices
    	or list the files with space as delimiter
    	1 - Password reset [sam system security]
    	2 - RecoveryConsole parameters [software]
    	q - quit - return to previous
    	[1]
    
  7. Hit "Enter" with the default option selected "[1]". Then ...:
    	=========================================================
    	. Step THREE: Password or registry edit
    	=========================================================
    	Loaded hives:   
    
    	  1 - Edit user data and passwords
    	  2 - Syskey status & change
    	  3 - RecoveryConsole settings
    		  - - -
    	  9 - Registry editor, now with full write support!
    	  q - Quit (you will be asked if there is something to save)
    
    	What to do? [1] -> 1
    

  8. Hit "Enter" with the default option selected "[1]". Then ...:
    	===== chntpw Edit User Info & Passwords ====
    
    	RID: 01f4, Username: <Administrator>
    	RID: 01f5, Username: <Guest>, *disabled or locked*
    	RID: 03e8, Username: <HelpAssistant>, *disabled or locked*
    	RID: 03eb, Username: <pnh>, *disabled or locked*
    	RID: 03ea, Username: <SUPPORT_388945a0>, *disabled or locked*
    
    	Select: ! - quit, . - list users, 0x<RID> - User with RID (hex)
    	or simply enter the username to change: [Administrator]
    

  9. Hit "Enter" with the default option selected "[Administrator]", or select another user account. Here you can enter the full user account surrounded by < and >, CASE-SENSITIVE, or enter the RID number (i.e. 0x1f4). Assuming you select the Administrator account, you should see the following screen:
    	RID     : 0500 [01f4]
    	Username: Administrator
    	fullname: 
    	comment : Built-in account for administering the computer/domain
    	homedir : 
    
    	Account bits: 0x0210 =
    	[ ] Disabled        | [ ] Homedir req.    | [ ] Passwd not req. | 
    	[ ] Temp. duplicate | [X] Normal account  | [ ] NMS account     | 
    	[ ] Domain trust ac | [ ] Wks trust act.  | [ ] Srv trust act   | 
    	[X] Pwd don't expir | [ ] Auto lockout    | [ ] (unknown 0x08)  | 
    	[ ] (unknown 0x10)  | [ ] (unknown 0x20)  | [ ] (unknown 0x40)  | 
    
    	Failed login count: 0, while max tries is: 0
    	Total  login count: 3
    
    	* = blank the password (This may work better than setting a new password!)
    	Enter nothing to leave it unchanged
    	Please enter new password: *
    

  10. At the prompt "Please enter new password", Enter the * for a blank password (HIGHLY RECOMMENDED!) then press Enter
    	Please enter new password: *
    	Blanking password!
    
    	Do you really wish to change it? (y/n) [n] y
    

  11. At the prompt, type in "y", then press Enter. Note that the default option is "n".
    	Do you really wish to change it? (y/n) [n] y
    	Changed!
    
    	Select: ! - quit, . - list users, 0x - User with RID (hex)
    	or simply enter the username to change: [Administrator] !
    

  12. Enter the "!" to go back to the main menu. Then select "q" at the following menu to quit:
    	<>========<> chntpw Main Interactive Menu <>========<>
    
    	Loaded hives:   
    
    	  1 - Edit user data and passwords
    	  2 - Syskey status & change
    	  3 - RecoveryConsole settings
    		  - - -
    	  9 - Registry editor, now with full write support!
    	  q - Quit (you will be asked if there is something to save)
    
    	What to do? [1] -> q
    

  13. A prompt to save changes displays, enter "y" to save:
    	=========================================================
    	. Step FOUR: Writing back changes
    	=========================================================
    	About to write file(s) back! Do it? [n] : y
    

  14. The changes are saved! You should see the following screen, press Enter, and reboot your computer.
    	Writing  sam
    
    	***** EDIT COMPLETE *****
    
    	You can try again if it somehow failed, or you selected wrong
    	New run? [n] : n
    

3 Useful Windows Tricks You Should Know About

3 Useful Windows Tricks You Should Know About

While there are tons of software that can extend Windows’ functionality, there are also several hidden features/unknown tricks in Windows that many are unaware of. The good thing is that these hidden features can be triggered without using any third-party software. Here are three tricks which can do wonders for your productivity, saving lots of time and frustration.
Whenever someone wants to move or copy a file or a folder in Windows, the usual method is to use the “Copy” and “Paste” command, either with the shortcut keys or the options in the context menu. If you are always copying/moving files to one particular folder, you might want to place that folder in the right-click context “Send to” menu so you can copy/move files easily and quickly.
To add a particular folder to the “Send to” menu, run (Win+R) or type the following address:
C:\Users\[YourUsernameHere]\AppData\Roaming\Microsoft\Windows\SendTo
Now you just have to delete the items you do not want on your “Send to” menu and add shortcuts to the ones you want. In the screenshot below you can see what my “Send To” folder looks like (be advised that Windows automatically adds a “Send To” option for your CD/DVD drive):

The relationship between the Shift key and the right-click

The “Shift” key is actually an important tool to use with the right-click context menu. If you right-click a folder and, with the left mouse button, click an item in the “Send to” menu, that folder will be copied to that destination. If you use it together with the “Shift” key, the folder will be moved instead (this also works for files, of course).

The “Shift” key is also useful to the right-click context. As you can see in the screenshots above, if you press the “Shift” key while right-clicking a folder or a file, you get an expanded “Send to” menu with lots of possible destinations like Documents, Pictures, and also the folders you have in your Home folder (hidden on the right screenshot). Also, if you right-click a folder while keeping the “Shift” key pressed, you will get an “Open command window here” item in the right-click context, which can be quite useful.
Wrapping up this section:
  • In order to change the items from the “Send to” menu, navigate to “C:\Users\[YourUsernameHere]\AppData\Roaming\Microsoft\Windows\SendTo;
  • Press the “Shift” key while left-clicking a “Send to” menu item in order to move the file/folder rather than just copying;
  • Press the “Shift” key while right-clicking a file/folder in order to bring up an extended “Send to” menu;
  • Press the “Shift” key while right-clicking a folder to add an “Open command window here” item in the right-click context.
Printing is insanely useful, but in Windows, it can also be a nightmare. We have all had the nerve-racking experience of having to cancel a printing job and, when we want to print another document, the job we stopped is still on the printing spool, blocking all the new jobs. The usual solution is to reboot our computers, but there is an easier way to solve this problem.
The first step is to stop the “Print Spooler” service. Simply open the Start menu and type “services,” or open a Run dialog (Win+R) and type “services.msc.” Scroll down until you reach the “Print Spooler” service, right-click it and hit “Stop” – do not close this window. Now go to the following directory:
C:\Windows\System32\spool\PRINTERS
and delete all its contents (you need administrator privileges to reach it).
Head to the Services window, right-click the Printer Spooler service and start it again. That is it; your printing queue should be completely clear now.
User Account Control (UAC) is a security technology that works by limiting application software to standard users. While it can be naggy some times, I strongly advise you not to disable it. There is a way to surpass UAC for known apps with a small app.

ElevatedShortcut is a tiny piece of software developed by Sergey Tkachenko, and it doesn’t require any installation. ElevatedShortcut uses the Task Scheduler to create “elevated shortcuts” that do not trigger UAC. You can create a completely new elevated shortcut from an existing shortcut, or you can convert an existing one directly to an elevated state.
In the screenshot above, I turned a UAC triggering shortcut (you can see the little shield on top of the icon, meaning that opening it triggers UAC) into an “elevated” one which does not trigger UAC. ElevatedShortcut is really easy to use, making it a great tool in order to surpass the UAC dialog for known apps.
Were you aware about these Windows tricks? Do you think they are useful? Let us know in the comments.

BASIC WINDOWS SHORTCUT KEYS

Basic Windows Shortcut Keys

The followings are some basic PC shortcut keys that are supported in most IBM compatible computers. They are also supported in most application software.
 
Use at your own risk.
Shortcut Keys Supported Window Versions Description
Alt + e 95, 98, ME, NT, 2000, XP, Vista Pull down the top Edit menu.
Alt + f 95, 98, ME, NT, 2000, XP, Vista Pull down the top File menu
Ctrl + a 95, 98, ME, NT, 2000, XP, Vista Select all text.
Ctrl + c 95, 98, ME, NT, 2000, XP, Vista Copy selected item(s) (to clipboard).
Ctrl + f 95, 98, ME, NT, 2000, XP, Vista Find.
Ctrl + v 95, 98, ME, NT, 2000, XP, Vista Paste copied item(s) from clipboard
Ctrl + x 95, 98, ME, NT, 2000, XP, Vista Cut.
Ctrl + Ins 95, 98, ME, NT, 2000, XP, Vista Same as Ctrl + c
Ctrl + (left arrow) 95, 98, ME, NT, 2000, XP, Vista Move one word to the left at a time.
Ctrl + (right arrow) 95, 98, ME, NT, 2000, XP, Vista Move one word to the right at a time.
Shift + Ins 95, 98, ME, NT, 2000, XP, Vista Same as Ctrl + v
Shift + Delelte (or Del) 95, 98, ME, NT, 2000, XP, Vista Cut. Or permanently delete selected item(s) on Windows Explorer.
F1 95, 98, ME, NT, 2000, XP, Vista Help.
Home 95, 98, ME, NT, 2000, XP, Vista Jump to the beginning of the line or page.
Ctrl + Home 95, 98, ME, NT, 2000, XP, Vista Jump to the beginning of the document or page.
End 95, 98, ME, NT, 2000, XP, Vista Jump to the end of the line or page.
Ctrl + End 95, 98, ME, NT, 2000, XP, Vista ump to the end of the document or page.
Shift + Home 95, 98, ME, NT, 2000, XP, Vista Set selection (highlight) from current position to beginning of the line or page.
Shift + End 95, 98, ME, NT, 2000, XP, Vista Set selection (highlight) from current position to end of the line or page.
Shift + (left arrow) 95, 98, ME, NT, 2000, XP, Vista Set selection (highlight) from current position to the left, one character at a time.
Shift + (right arrow) 95, 98, ME, NT, 2000, XP, Vista Set selection (highlight) from current position to the right, one character at a time.
Shift + (down arrow) 95, 98, ME, NT, 2000, XP, Vista Set selection (highlight) from current position to the next line down.
Shift + (up arrow) 95, 98, ME, NT, 2000, XP, Vista Set selection (highlight) from current position to the next line up.

WINDOWS XP SECRETS - HIDDEN SECRETS UNVEILED!

Windows XP Secrets

Notepad Secrets
Create a log
  1. Open Notepad
  2. On the very first line, type in ".LOG" (without quotes) then press Enter for a new line
  3. Now you can type in some text if you want, then save the file.
  4. Next time when you open the file, notice its contents. Notepad automatically adds a time/date log everytime you open the file.
Text becomes unreadable
  1. Open Notepad
  2. On the very first line, type in "dont eat the donut" (without quotes) then save and close the file. Note: the file should have only one line of the text above.
  3. Now, open the same file. You'll notice the text becomes unreadable squares. (try this with different text with the same format and length).
Paint Secrets
Create a trail image
  1. Open Paint, then open an image.
  2. Right-click on the image and select "Select All"
  3. Now hold the "Shift" key and move the image around. The image will be drawn with trail.
10x Zoom
  1. Open Paint, then open a small image.
  2. Select the zoom "Magnifier" tool.
  3. Windows Paint lists out the zoom options from 1x to 8x, but there is a 10x...
  4. After selecting the Magnifier tool, point the mouse right at the border line right under "8x" and left-click. There you go.. the hidden 10x.
Other Secrets
Where is the relaxing music that you've heard during Windows XP Installation?
  1. The file is in:
    C:\Windows\system32\oobe\images\title.wma
Game Secrets
Solitaire: Instant Win
  1. Press Alt + Shift + 2 to instantly win
Solitaire: Draw only 1 card (instead of 3)
  1. Hold down Ctrl + Alt + Shift then click on unopen cards to draw.
FreeCell: Instant Win
  1. Hold down Ctrl + Shift + F10 while playing, then click Abort.
  2. Now move one card.
FreeCell: Hidden Game Modes
  1. Go to "Game" menu choose "Select Game"
  2. Here you can choose from game mode 1 to 1,000,000. But -1 and -2 will also work (hidden modes)
Hearts: Show All Card
    Warning! this requires a modification on your registry. Be sure you follow the steps carefully. Damage your registry might damage your Windows.
  1. Open the "Registry Editor" by: "Start" >> "Run" then type "regedit" and press Enter
  2. Expand to HKEY_CURRENT_USER\Software\Microsoft\Windows\CurrentVersion\Applets\Hearts
  3. Right-click on the right panel and create a new String value with the name "ZB"
  4. Double-click to open this key "ZB" to edit its value. Then enter "42" and close the Registry Editor.
  5. Start Hearts and Press Ctrl + Alt + Shift + F12 to show all the cards
Minesweeper: Stop The Timer
  1. When you start to play a new game, the timer is ticking...
  2. Press Windows Key + D to show desktop.
  3. Now come back to the game by selecting it from the taskbar. The timer is stopped.
Pinball
  1. Unlimited Balls: Type bmax at a new game to get unlimited balls (no notification).
  2. Extra Balls: Type 1max at a new game to get extra balls.
  3. Gravity Well: Type gmax at a new game to activate Gravity Well.
  4. Promotion: Type rmax at a new game or while playing to get instant promotion and raising rank.
  5. Extra points with partial shots: Partially shot the ball just to pass the yellow light bars. There are 6 bars. With the first bar, you'll get 15,000 points, 2nd: 30,000,...
  6. Extra points with partial shots: Partially shot the ball just to pass the yellow light bars. There are 6 bars. With the first bar, you'll get 15,000 points, 2nd: 30,000,...
  7. Test Mode: Type hidden test with a new ball or new game. Now you can use your mouse to drag and move the ball where you want.

HOW TO CREATE A PASSWORD-PROTECTED FOLDER WITHOUT USING SOFTWARE


HOW TO CREATE A PASSWORD-PROTECTED FOLDER WITHOUT USING SOFTWARE


Hello everyone, Today we will see how to create password protected Folders without software.
Securing personal files/softwares cannot be guaranteed in a situation whereby more than one person is permitted to make use of a computer.


In this case,it is very necessary to ensure all sensitive/personal documents are kept hidden from the view of such users.But how can you do that without a software?
Well,here’s an easy way to it.
So,if you think there’s a file/folder you’d like to keep hidden from the reach of others,just follow the steps below.

How To Secure Files/Folders Without Software

Create a new folder and create a new ‘Text Document’ in it by right-clicking and selecting ‘New’ » ‘Text document’.
Copy – Paste the following code snippet in the text document


cls @ECHO OFF title Folder Private if EXIST “Control Panel.{21EC2020-3AEA-1069-A2DD-08002B30309D}” goto UNLOCK if NOT EXIST Private goto MDLOCKER :CONFIRM echo Are you sure you want tolock the folder(Y/N) set/p “cho=>” if %cho%==Y goto LOCK if %cho%==y goto LOCK if %cho%==n goto END if %cho%==N goto END echo Invalid choice. goto CONFIRM :LOCK ren Private “Control Panel.{21EC2020-3AEA-1069-A2DD-08002B30309D}” attrib +h +s “Control Panel.{21EC2020-3AEA-1069-A2DD-08002B30309D}” echo Folder locked goto End :UNLOCK echo Enter password to unlockfolder set/p “pass=>” if NOT %pass%== password here goto FAIL attrib -h -s “Control Panel.{21EC2020-3AEA-1069-A2DD-08002B30309D}” ren “Control Panel.{21EC2020-3AEA-1069-A2DD-08002B30309D}” Private echo Folder Unlocked successfully goto End :FAIL echo Invalid password goto end :MDLOCKER md Private echo Private created successfully goto End :End


Locate `Password here` in the code above and change it to whatever password you want to use (Simple to remember,but hard for others to guess)

Now click on File » Save as and give it any name you so desire but with a .bat extension.
E.g : Lock.bat
Now,exit notepad and on getting to the new folder you created previously, you’ll see a “LOCKER” command.
Double-click on this file and a new folder will appear (Private OR Confidential)
Now,copy/move all you want to hide in this “Private/Confidential” folder and go back one step.
Double-click on the “LOCKER” command again and you’ll be greeted with something new.
Just press ‘Y’ as instructed and hit enter.
Immediately,the ‘PRIVATE / CONFIDENTIAL’ folder will disappear.Now,all your files & documents are secured in this hidden folder.
To undo hiding,double-click on this “Locker” command again and input the password you used above. Hit Enter and the hidden folder will re-appear..Now,that’s it.

NOTE:These files can still be sometimes accessed using the search,so it is highly recommended you rename your files before hiding them so as to ensure its maximum security.

If you think this article is useful to you plz share it, tweet about it and like us on FACEBOOK
 
Thank you :)

How to Optimize your PC performances

Why Computers Slow Down

However, although computers do slow down after the installation of software, the main reason they get slower is because every year newer software has bigger and bigger requirements. For example: The Windows 98 operating system required 24 megabytes of memory and just 200 megabytes of hard drive space, whereas Windows 7 requires 2 gigabytes of memory and 20 gigabytes of hard drive space. As we learned in How to Back Up Your Data, a gigabyte is about a thousand megabytes so in a 10-year span the requirements for computers have increased 100 times. Who wouldn’t slow down!
For us, this means that without upgrading, our computer’s specifications don’t change at all. But every year, software needs more and more of your computer’s precious resources. So when you install software on a 5-year-old computer, it will slow it down a lot more then it would if you installed it on a new computer.
People run into this problem a lot when they wipe their computer clean and reinstall the operating system. Their computer will be just as fast as the day they bought it, but the moment they install new software that is a few years younger than the computer, well, that’s when it slows way down again.
That said, I would like to debunk one myth that seems to persist in the technology world year after year:
Registry cleaners do not work! The registry in Windows keeps information about your system and programs so programs that claim to “clean” the registry might end up deleting information that allows your programs to run correctly. My advice is to just avoid cleaning your registry altogether.
They can even be harmful to your computer. If you come across programs that promise to clean your registry, I advise against them.

How to Optimize Your Computer

There are 4 things that take just a few minutes of your time, but can make a significant difference in how fast your computer performs:
  1. Clearing your cookies and other temporary web data every so often will really increase how fast your internet browser responds, and will even fix most problems you have with the internet. Here’s a link on how to do this with many popular web browsers.
  2. Running security scans is something you should set up to happen automatically each week. If malware has infected your computer, you can bet that it will take a very large portion of your computer’s resources for its own malevolent purposes. Checking for malware once a week will definitely help to keep your computer running at tip-top shape.
  3. Along with keeping your antivirus software up to date, keeping your operating system supplied with the latest updates will do a world of difference. I know that many people out there (certainly not my listeners) hit the “skip” or “remind me later” button when their computer asks to install updates. I recommend checking for new updates a few times a month, because many of these updates will help to close security holes, and will also optimize certain aspects of your operating system.
  4. One of the biggest boosts to your machine’s performance would be to limit the items that start when your computer boots up. I generally only have 3-4 programs open at start up, and then only run the programs I need to use when I need them. If you have 20+ programs running automatically when your computer starts, not only will it take forever to boot, but it will be slow the entire time you use it. This happens because even if you’re not using these programs, they will run in the background, which still uses your computer’s resources. Here are links on how to prevent programs from starting on both Windows and Mac machines.
Here are your 4 Quick and Dirty Tips for speeding up your computer:
  1. Delete cookies and temporary files from your internet browser frequently
  2. Run your antivirus at least once a week to make sure no malware snuck into your system
  3. Keep your antivirus and operating system up to date
  4. Limit the amount of programs that run automatically when you start your computer
One thing I did not mention in this episode was reinstalling your operating system. While this would probably make the most difference in speeding up your computer, it is fairly time consuming and technical and should not be attempted by anyone except a professional.
Well that’s all for today!
- See more at: http://www.quickanddirtytips.com/tech/computers/how-to-make-your-computer-faster#sthash.8nU3fvPx.dpuf

Why Computers Slow Down

However, although computers do slow down after the installation of software, the main reason they get slower is because every year newer software has bigger and bigger requirements. For example: The Windows 98 operating system required 24 megabytes of memory and just 200 megabytes of hard drive space, whereas Windows 7 requires 2 gigabytes of memory and 20 gigabytes of hard drive space. As we learned in How to Back Up Your Data, a gigabyte is about a thousand megabytes so in a 10-year span the requirements for computers have increased 100 times. Who wouldn’t slow down!
For us, this means that without upgrading, our computer’s specifications don’t change at all. But every year, software needs more and more of your computer’s precious resources. So when you install software on a 5-year-old computer, it will slow it down a lot more then it would if you installed it on a new computer.
People run into this problem a lot when they wipe their computer clean and reinstall the operating system. Their computer will be just as fast as the day they bought it, but the moment they install new software that is a few years younger than the computer, well, that’s when it slows way down again.
That said, I would like to debunk one myth that seems to persist in the technology world year after year:
Registry cleaners do not work! The registry in Windows keeps information about your system and programs so programs that claim to “clean” the registry might end up deleting information that allows your programs to run correctly. My advice is to just avoid cleaning your registry altogether.
They can even be harmful to your computer. If you come across programs that promise to clean your registry, I advise against them.

How to Optimize Your Computer

There are 4 things that take just a few minutes of your time, but can make a significant difference in how fast your computer performs:
  1. Clearing your cookies and other temporary web data every so often will really increase how fast your internet browser responds, and will even fix most problems you have with the internet. Here’s a link on how to do this with many popular web browsers.
  2. Running security scans is something you should set up to happen automatically each week. If malware has infected your computer, you can bet that it will take a very large portion of your computer’s resources for its own malevolent purposes. Checking for malware once a week will definitely help to keep your computer running at tip-top shape.
  3. Along with keeping your antivirus software up to date, keeping your operating system supplied with the latest updates will do a world of difference. I know that many people out there (certainly not my listeners) hit the “skip” or “remind me later” button when their computer asks to install updates. I recommend checking for new updates a few times a month, because many of these updates will help to close security holes, and will also optimize certain aspects of your operating system.
  4. One of the biggest boosts to your machine’s performance would be to limit the items that start when your computer boots up. I generally only have 3-4 programs open at start up, and then only run the programs I need to use when I need them. If you have 20+ programs running automatically when your computer starts, not only will it take forever to boot, but it will be slow the entire time you use it. This happens because even if you’re not using these programs, they will run in the background, which still uses your computer’s resources. Here are links on how to prevent programs from starting on both Windows and Mac machines.
Here are your 4 Quick and Dirty Tips for speeding up your computer:
  1. Delete cookies and temporary files from your internet browser frequently
  2. Run your antivirus at least once a week to make sure no malware snuck into your system
  3. Keep your antivirus and operating system up to date
  4. Limit the amount of programs that run automatically when you start your computer
One thing I did not mention in this episode was reinstalling your operating system. While this would probably make the most difference in speeding up your computer, it is fairly time consuming and technical and should not be attempted by anyone except a professional.
Well that’s all for today!
- See more at: http://www.quickanddirtytips.com/tech/computers/how-to-make-your-computer-faster#sthash.8nU3fvPx.dpuf